
Air Combat Manoeuvres
Continued part 2
Organization and Communication:
The Schwarme (or Flight) consists of two R�tten (aka
Elements or Sections), each with a lead & wingman pair. The overall
lead is the Flight Leader, and is the pilot directing the flight.
The lead of the other pair is called the Section Leader, and he
commands/coordinates his pair.. but is himself under direction of the Flight
Lead. In many of the diagrams that follow (and sometimes communicating) ,
planes will be numbered according to what the pilot's position in relation
to the flight are. The position are as follows:
- Flight Lead
- Lead's Wingman
- Section Lead
- Section Wingman
When assignments are handed out, they will always be in
the order they are called out. i.e.: 1st pilot called is lead, 2nd is his
wingman, 3rd is section lead, 4th is section lead's wingman. Remember that.
To make communication efficient, the Flight &
Section leaders will be doing the bulk of the talking. Wingmen for the
most part should be silent. Whilst cruising in enemy/hostile territory, all
they really should be doing is alerting the leads of threats and replying
when transmitted to. Exceptions are:
- When the information they posses is of importance
- They have an urgent/important question they need
answered (less-important ones are to be done on squad channel)
- When in the attack phase of combat, to coordinate
with their lead.
- Basically, just use common sense.
There are many reasons why this is more efficient. Here's
one an example of a common problem:
Four guys get together and head out on a mission, someone
logs in and says "Sup guys, where's the flight?" They all proceeded to reply
to it at the same time and a giant fart cloud gets transmitted over
teamspeak.
In Reality, it's flight lead's job to handle it (or
staffel lead, mission lead.. etc. etc.). If he doesn't reply in a
timely manner, Section Lead handles it. If neither reply's in a timely
manner (due to being busy or whatever), a wingman can do it out on text.
This prevents everyone from replying at the same time on TS to the same
question. This is not something to overlook, because during bigger flights
this type of stepping on each other's communications happens allot and in
many many other instances. Be aware of it and communicate with organization.
Know your position and duties in the flight. In a nutshell, while in hostile
airspace... flight-lead talks with section-lead to coordinate their pairs,
wingmen transmit only when it's necessary
To make communication even more efficient, you can use
numbered radio calls. This is useful if the pilots are unfamiliar with each
others voices, and can also be beneficial to some degree in combat. With
this small of a unit though, it's usually not necessary if the pilots are
extremely familiar with each other. But nonetheless, it does make allot of
transmissions more clear. What this type of communication method does, is
let everyone know immediately where the transmission came from in the
flight, to who its directed to, and how it relates to them as part of the
flight.
Formations:
There's roughly five different formations we'll use from
time to time as a schwarme. They are: Line-Abreast,
Element-Abreast (2 variations), Finger-Four (aka Schwarme),
Section and Stinger, and Echelon (Right or Left). While
cruising it's important to note the spacing, too close and visibility is
lost. Too far and manoeuvring the formation is difficult; and support to a
targeted fighter is limited. Here they are:
Air Combat Manoeuvres Continued part 2
Organization and Communication:
The Schwarme (or Flight) consists of two R�tten (aka Elements or Sections), each with a lead & wingman pair. The overall lead is the Flight Leader, and is the pilot directing the flight. The lead of the other pair is called the Section Leader, and he commands/coordinates his pair.. but is himself under direction of the Flight Lead. In many of the diagrams that follow (and sometimes communicating) , planes will be numbered according to what the pilot's position in relation to the flight are. The position are as follows:
- Flight Lead
- Lead's Wingman
- Section Lead
- Section Wingman
When assignments are handed out, they will always be in the order they are called out. i.e.: 1st pilot called is lead, 2nd is his wingman, 3rd is section lead, 4th is section lead's wingman. Remember that.
To make communication efficient, the Flight & Section leaders will be doing the bulk of the talking. Wingmen for the most part should be silent. Whilst cruising in enemy/hostile territory, all they really should be doing is alerting the leads of threats and replying when transmitted to. Exceptions are:
- When the information they posses is of importance
- They have an urgent/important question they need answered (less-important ones are to be done on squad channel)
- When in the attack phase of combat, to coordinate with their lead.
- Basically, just use common sense.
There are many reasons why this is more efficient. Here's one an example of a common problem:
Four guys get together and head out on a mission, someone logs in and says "Sup guys, where's the flight?" They all proceeded to reply to it at the same time and a giant fart cloud gets transmitted over teamspeak.
In Reality, it's flight lead's job to handle it (or staffel lead, mission lead.. etc. etc.). If he doesn't reply in a timely manner, Section Lead handles it. If neither reply's in a timely manner (due to being busy or whatever), a wingman can do it out on text. This prevents everyone from replying at the same time on TS to the same question. This is not something to overlook, because during bigger flights this type of stepping on each other's communications happens allot and in many many other instances. Be aware of it and communicate with organization. Know your position and duties in the flight. In a nutshell, while in hostile airspace... flight-lead talks with section-lead to coordinate their pairs, wingmen transmit only when it's necessary
To make communication even more efficient, you can use numbered radio calls. This is useful if the pilots are unfamiliar with each others voices, and can also be beneficial to some degree in combat. With this small of a unit though, it's usually not necessary if the pilots are extremely familiar with each other. But nonetheless, it does make allot of transmissions more clear. What this type of communication method does, is let everyone know immediately where the transmission came from in the flight, to who its directed to, and how it relates to them as part of the flight.
Formations:
There's roughly five different formations we'll use from time to time as a schwarme. They are: Line-Abreast, Element-Abreast (2 variations), Finger-Four (aka Schwarme), Section and Stinger, and Echelon (Right or Left). While cruising it's important to note the spacing, too close and visibility is lost. Too far and manoeuvring the formation is difficult; and support to a targeted fighter is limited. Here they are:
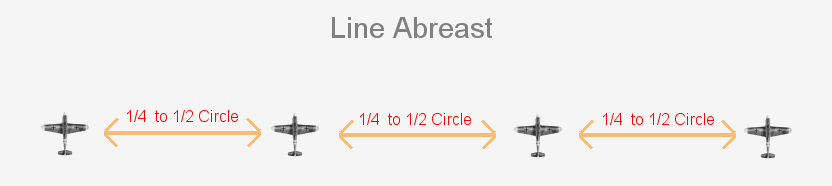
Nothing new with the Line-Abreast, it's identical to the 'pair' version... just 2 more planes added. I've left the pilot positions without labels for this one because the most effective positions for flight-lead/section-lead & lead/wingman pairs is highly debatable, and we'll just have to find out what would be the most effective positions. Standard Line-Abreast Turning procedures apply here, but with the wider formation, turning takes longer. With that in mind, it's best for long cruises when not too much turning is expected. Note: If you are more than a half circle out, you are too far away.
A spin off of the Line-Abreast, The Element Abreast has the wingmen sucked into Wedge ( a short echelon) to make the formation more manoeuvrable. The wingman can either be 'inside' or 'outside' of their lead. Outside is standard, but when 'inside' is desired, the lead calls "Wingmen tucked in". This allows him to keep an eye on the wingman while following his standard Line-Abreast scan procedure towards the #3 ship, without having to look the other way. Turning this formation is much quicker than the full line, and because of this it will be used much more frequently. Pilots 1 & 3 apply standard Line-Abreast turning procedures, while 2 & 4 apply Wedge turning (described later).
Element Abreast is also very useful prior to engagement. Since the wingmen are already in their supporting positions, instantaneous flight-wide pincer manoeuvres such as brackets, single side offsets, drags, defensive splits etc. when needed are much more organized.
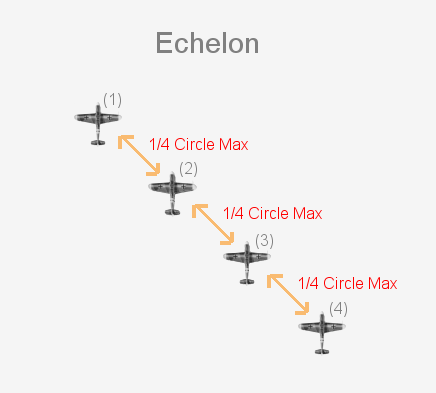
Basically, it's just a long wedge. The formation can be either left or right. While not used much it can be useful at times, especially if there are more than one schaerme operating, but that's a different topic altogether.
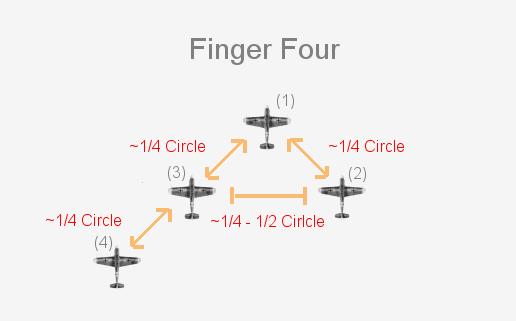
Similar to the Echelon is the Finger Four (or Combat Spread). The difference is that one plane is on the opposite side of the leader. Simply put, whichever side 2 is on, 3 & 4 go to the opposite side. It's a very manoeuvrable formation when used with wedge turning techniques. If you look closely, you'll see that 3 & 2 are pretty much line abreast and with ideal spacing, so view coverage is not as bad as it seems at first glance.
The Section and Stinger (or Scorpion as I like to call it), can be nasty when it works. Basically you've got one section out front in line abreast, with another section in the far rear and higher (the formation they use is up to the Section Lead). What you're doing here is masking your numbers, and having a reserve flight with more energy. Enemy approaching the front section won't see the 'Stingers'. Depending on the situation, they may be more inclined to stick around or even burn their advantage against what they think is an advantageous or neutral situation for them. After they are snatched into a fight by the lead section, the stingers come ploughing through. The stingers are frequently the tide-turners in neutral situations & the saviours in disadvantageous positions.. catching the enemy by surprise. If the front section has it under control, they move in & go into a supporting lookout role until needed. I call it the scorpion because the front section acts like the claws to snag the enemy, while the other section is the stinger slamming down for the kill. Btw, I think my nipples just got hard :)
Ok so why not do this all the time? Because with the forces split, you can be vulnerable. Depending on the map situation or if the area is extremely hostile.. it may not be a good idea to do this with just a single schwarme.
So which formation to use when? Line-Abreast for long straight line cruises with not much turning expected. Element Abreast, when frequent course changes can be expected and view coverage is still the top priority (Good for patrolling). Finger-Four, when frequent and more quick/fluid course changes are are the priority. Section & Stinger when you're feeling evil, and Echelon only when it makes sense to do so.
Flight lead determines the formation used. Flight Lead, along with Section Lead, are to make sure the formation is maintained. If your wingman is too far back tell him to move up. If he's too far out, tell him to move in. If someone is out of place, or is completely out of formation, request that they fall back into formation. Don't get lax in this area, because if you do.. they definitely will. Formation flying is a key ingredient, it not only promotes teamwork and coordination.. but it is also vital for survival in an ever changing environment.
Formation Turning:
You should all be pretty familiar with Line-Abreast turning techniques, so I wont go over it again here. But I will go over again how to turn a wedge. The mechanics are simple, but we'll start with a 2-ship example first for simplicity. Basically, you turn the same time the lead does. If you are on the inside of him in relation to the new heading you drift to his outside (slightly leading him somewhat at the very start, then easing out) during the turn. If you are on the outside, you just cut inside him. How fast/hard you turn depends on three things: How fast the leader is turning, what the desired end course is, and what side of him you are on. It just takes practice. Here's two Flash animations of 90 degree turns:
Starting on the outside, you cut in:
Starting on the inside, you drift out:
Doing it with four planes in a formation is no different, you just turn according to what side you are on in relation to the guy in front of you:
Finger Four:
Note: If the game has friendly collisions, #2 may have to rise slightly.. and #3 may have to dip to avoid crashing.
Pretty simple stuff, just takes some practice. They can be done for any angle up to 90 degrees and keep the formation relatively intact. For more than 90 degree turns, it will have to be done in two parts.. but one fluid movement can be achieved if the wingmen first cut-in/drift to the halfway point and then cut-in/drift again... this with the lead keeping his constant turn. It must be stressed that the Lead shouldn't be flying at max power during these longer turns, so that wingmen have a little upper end throttle movement if they need it. Though, for 90 degree turns and lower, they shouldn't need that extra throttle, but for more than that they might. *note: when cruising in formation the lead should never be at full throttle anyway.
That about wraps up the pre-engagement phase, Organization.. Communication & Formations. Now its time to talk about combat.
Attack Doctrine:
Gaggle Doctrine
Attack doctrine for a schwarme can be put in two categories: organized attack, or mutual support through presence. Obviously whenever possible, organized attack is preferable, but in some situations a full on attack may be necessary... with all pilots free to engage. Sometimes this type of engagement is forced upon the flight whether they wanted it or not. When faced with this type of engagement, support is usually through presence only. Care must be taken not to stray too far, or support through presence is lost.
This type of engagement falls under Gaggle Doctrine. With this type of attack, pilots should always keep tabs on where the threat sector is. It's the the area of sky where the main battle is taking place, and usually has the highest concentration of enemy. They should try stick to the edges of this threat sector and attack anything that strays to far away from it. After attack on an enemy near the edge of the threat sector or if they are themselves attacked they should head back towards the threat sector area, because this is where the other flight members will be, if they head away from it.. they are heading away from help. It's not wise to run down enemies that are leaving the threat sector. Usually, when this type of fight is forced on the flight, they should make all efforts to disengage and reform at a rally point; before preceding to head back in and attack in a more organized manner with the advantage.
As stated before, sometimes this type of fight may be preferable. Depending on the situation, an axe is sometimes more useful than a sword. Especially when time is of importance. Just be cautious with its use. Take into account the general atmosphere of the war, the area you are in, and make sure the pilots in your flight are skilled enough to handle it.
Welded Pairs
This one really isn't unique. It's basically just the flight operating as a 2-ship with each section employing a fighting wing doctrine. It's employed typically like a single pair would, which is usually in the Double-Attack using small variations. While OK for situations where you are firmly in control, like the 2-ship version... it's not flexible enough to keep up a sturdy offence and defence at the same time. Manpower is wasted and can therefore just prolong the engagement. Typically, in this mode of attack you're either not putting enough pressure on the enemy, or you are putting up adequate offensive pressure but with less than adequate look out. It has its uses though, so don't discard it altogether.
Fluid Four
By far the best engagement method for a schwarme is Fluid Four. Fluid Four builds on the earlier concepts presented in R�tte tactics. If you recall, there are three basic forms. Fighting Wing, Double Attack, and Loose Deuce. As stated there, Double Attack & Loose Deuce were the best methods of attack. One giving up defence for a stronger offence (Loose Deuce), the other giving up some offence for defence (Double Attack). The beauty of Fluid Four however, is that you use all three doctrines simultaneously to keep all bases covered. Note: Revisit the R�tte tactics pages if you need a refresher.
To accomplish this feat, the Flight as a whole goes into double attack mode. One section is 'free' and in a lookout/support role, while the other is offensive. But it doesn't stop there. The offensive section itself goes into loose deuce posture. That is, separate entities working together aggressively in offensive manoeuvring. With a free section providing cover, the engaged section is free to be more aggressive. The covering section will usually be in a loose fighting wing posture (due to the frequent manoeuvring they may need to do to stay in sight), above and within sight of the engaged pair. A common mistake is for the cover element to be too far away to be of immediate assistance. This is important.. don't overlook it.
The type of attack by the engaged section depends mainly on the situation. If grossly out matched, it might just be an in-and-out type of deal with both picking their own targets, attacking, then quickly egress on the same course. If the situation is highly in their favour (numbers wise) they may go into a more traditional loose deuce type of engagement, one pilot taking the fight directly to the enemy to put pressure on him while the other offensively manoeuvres for the kill shot/clears him when he has to break off. When the fight leans more to neutral (numbers wise) but they have the advantage in energy, they can still be more aggressive than usual because of the cover flight. But they must make their engagement quick and leave on the same heading before they get sucked in. They are not to stray too far away or go on extended tail chases. They get in quick, fight aggressively and short and leave together before they've lost the advantage. Being aggressive (but aware of the area), is why Fluid Four works. You can afford to push the issue more than normal if everyone is on top of things.
The free section is there for 3 three reasons:
- To keep a look out and warn of approaching danger to the engaged section.
- To resume the fight when the engaged section makes its exit.
- To dive in and clear the engaged section if they are being followed when trying to disengage.
Take note of the last one. If while exiting a fight, either because they were successful or were forced to exit, the free section dives in to clear them if they are being followed. The extending section is not to keep repeatedly leap frogging & clearing themselves. One time is sufficient. The free section will be boring down on them.. so drag them. This is how allot of engagements go south; everyone leap frogging as they try to extend and no-one really looking around.. other than at the offending enemy.
If the free section, is needed to clear the engaged section's exit instead of immediately going loose deuce... two things can happen:
- The flight as a whole may just extend together after the six clear and regain SA, Energy etc. If that is done, the next attack should start with the pair that were lookout on the last one, unless circumstances prevent it.
- The 'previously free' section immediately reverses (in the vertical) to resume the fight using Loose Deuce tactics to keep the pressure on the enemy while the other section takes over as look out.
Throughout all of this, speed is of importance. What is the number one reason why perfectly advantageous attacks wind up going bad? Staying too long. The engaged pair must go in aggressively, hit fast/hard and get out.... and stay out till they are needed by the other section. If the free section is forced to come down to help out.. the engaged section should cease offensive action in a timely manner and exit the fight to take over as look out. Too often, when the look out section is forced to help.. the engaged section doesn't exit.. or if they do they go right back in. When this happens no one is providing lookout and no one is holding on to the element of advantage. It doesn't take too long before more bad guys show up and ruin the party.
Note: It must be stressed that the engaged section is not to get so aggressive that they blow any chance they have of exiting the fight.
At the start of an engagement with the advantage (altitude), it may be more desirable to form into welded pairs for the initial assault. A first strike with slightly delayed paired attacks as in the normal r�tte doctrine, or a simultaneous attack by both sections can shake the enemy up. For a simultaneous attack, free and engaged roles for each section following the attack must be made known before hand. Heading in from two sides is always more preferable, but don't waste time setting it up if you are going to lose the initiative. After the pounce, sections take up the previously designated starting roles.
With a delayed-pair strike, the second pair immediately goes on the offence (to keep the pressure on the enemy) after their initial bounce and stays offensive using energy tactics, while the first pair zooms back up to setup lookout. Then the fluid four doctrine goes to work on the now disarrayed enemy. Again, it must be stressed that the lookout pair is not to wander off and to stay overhead in visual proximity of the engagement. They will be called back into action shortly to either resume the fight or to clear the engaged section's exit. If they are needed to clear the exit of the engaged section, a call must be made whether the flight should just disengage & egress or resume the fight.. If no call to disengage comes, and things are still looking good... the roles swap and the offensive is resumed by the other pair.
Many times, the flight may quickly find itself in a fight before they have time to establish a position of advantage or coordination. Whatever the reason is, the flight may have to temporarily abandon the Fluir Four mindset to regain the upper hand. Sometimes the flight may get scattered due to the enemy's attack and Gaggle Doctrine results. Other times the pairs can stick together and the sections could operate somewhat independently as welded pairs while they stave off their attackers. Whatever the situation calls for. Once the upper hand is regained however, care must be taken that not everyone remains engaged. One section should take up the supporting role. If the upper hand cannot be achieved in a timely manner a tactical withdrawal is in order.
Remember, it's speed, aggression and coordination that defines the Fluid Four. Get in, act aggressive, and get out. The other pair will cover your exit and resume the fight if needed. In Fluid Four's most aggressive form... the engaged section should try to gang up on a single enemy when possible. When his comrades finally notice/recover from the initial attack and try come to his aid is when it's time to make your exit and let the look-out flight ruin their day. Obviously, this wont be possible all the time or not worth attempting if there are too many enemy. If swamping a single fighter is not possible, multiple targets may be attacked as long as the engaged pilots remember that they are a two-ship and don't get too wrapped up in their individual assaults. Care should be taken to always exit on the same heading so that the free flight can properly clear them and remain intact to resume the offensive.
At any point in an engagement when things start to break down, its always advisable to withdraw and regroup. Here's some things to look for:
- Sections getting split up during the engagement
- Pilots losing track of their wingmen
- Comms start getting out of control
- Too many fights going on at one time
When these problems start arising, it's time for the Flight lead to tell his pilots to disengage and rally... so the group can resume the offensivein a more cohesive manner. When that call goes out, all offensive action should stop in a timely manner. The only attacks to be made are for defensive clears of squad mates trying to leave the area. Once they are out of danger and have the separation needed to leave... you are to head out together to the rally point, not to keep leap frogging back onto the enemy. Obviously if there is an enemy in your path to the rally point that has left himself wide-open.. take em, but don't let it distract you from rallying. The goal is a quick tactical withdrawal for a regroup.. having to turn back around to help someone who should have already left is one of many reasons things go bad.
Fighting as a schwarme is always more effective than fighting as a pair. That's why it's not advisable that they split up into sections and operate independently. If you're doing that, you may as well just use two different TS channels... because it won't be long that each section gets tied up in it's own fights and creating massive problems. The schwarme is the basic unit of a squadron.... not the pair. Yes, the pair is the most basic form of any fighting unit.... but the schwarme is the smallest usable 'effective' unit. Schwaerme are not to split up.
*** This was an extremely rough draft (or rambling if you will..) of the fluid four doctrine.. more will be explained and made more clear in later versions. expect text rewriting / rewording as it gets put to use and is fleshed out more. It's aim currently is to get you in the right mode of thought.
Schwarme tactics aren't really anything new, it just expands on the Rotte. Staffel tactics on the other hand, is where you'll really start seeing things come together. If done right... it will take the "Domination Through Teamwork" motto to a new level. With a couple schwarme operating together, you can lock down an area (under normal game conditions) if done right.
Special Circumstances:
If while cruising, the flight is being attacked by a higher BnZ'r, the best course of action is not to all climb up after him. If there are many of them, don't push your luck, make a timely escape. If it's just one or two and you are intent on not giving up your altitude or retreating.... disperse, so he can't keep tabs on everyone. One section should try to hold the enemy, while the other section sneaks away to climb. The holding section should not keep climbing after the enemy between attacks, because it only makes the enemy climb as well (if he's smart)... and increasing the time it takes for the other section to get the alt required to force the enemy defensive. The holding section should try fend off the BnZr's attacks and force him lower whenever possible. Once the free section has gained the alt required, they head back to the threat sector and engage the offending enemy. Once the upper hand is achieved, the holding section goes into support/look out role of the Fluid Four.